Monday, 20 January 2014

Creating an Amiga boot sequence for WHDLoad... MY way!

Slow/cumbersome typing to maximise memory via WHDLoad? Sod that! Time for my OWN quick menu...

All of the following is probably basic stuff for regular Amiga fans, but as it was all new to me I thought maybe I'll share my experience in case it helps others.

Recently realised after regularly typing lots to launch games via WHDLoad and Shell prompt, why I don't I write my own boot sequence?! With my OWN short cut buttons!  Is this even possible?

YES and I've written how I achieved it!

I'll point out now that even though I grew up with the Amiga, and yes tinkered around with coding/Workbench/Shell etc... it has now dawned on me, actually I just touched the surface of how the whole Amiga worked.

Lets get a Hard Drive... oh hello WHDLoad?

Always having had an Amiga 500, when I saw a cheap Amiga 1200 on ebay I couldn't resist getting it. OK it had a bust floppy drive, but that was easily sorted by buying one from Amiga Kit (http://www.amigakit.eu).

No memory extension with just 2Mb RAM and no hard drive.  After a bit of hunting around I purchased a Compact Flash card + connector from ebay to finally hook up my Amiga 1200 with a hard drive.

Took Amiga apart, fitted the Compact Flash connector, turned it on, BAM job done.  It was at this point I was introduced to WHDLoad.  Always having an Amiga 500, floppy disks were THE only way, (sure I bet you can by a CF connector today).  I'm still not sure what a hard drive would have done back in the day, just one big floppy disk? to save games? backups?   But now it turns out games and programs can be stored on the harddrive and launched via WHDLoad.

As my Amiga 1200 has minimal RAM, I can't launch WHDLoad games in Workbench itself, clearly not enough memory, so there is an option when I reboot my machine holding down the left mouse button launches a Shell window prompt.  From here I have to locate the directory on the hard drive of the game I wish to launch then type out a command to launch it.  As Workbench hasn't loaded yet, the memory is ready and waiting to load+launch the game.

Great!
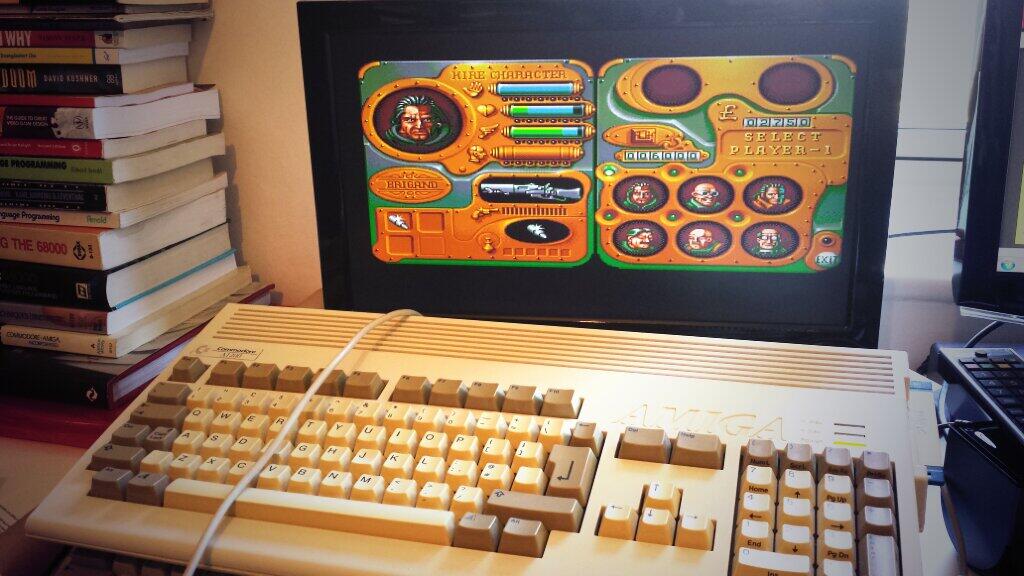
My Amiga 1200 in action! (Chaos Engine)

OK... my poor fingers!

Yes I do miss the Amiga keyboard, yes keyboards have come a long way since.  When I want to simply launch a game, there's actually a lot of typing.  Sometimes I have to double check the folder structure spelling, then locate the directory with the game in it. Then launch it.  Yes, this IS straight forwards stuff, but feels like there's so much typing for such a simple task, especially for games I play over and over again.
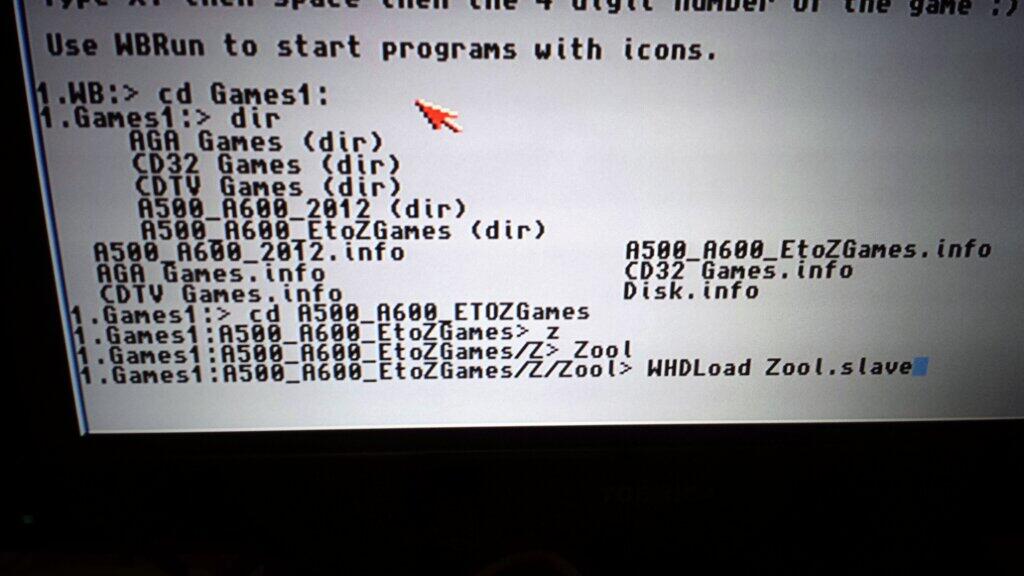
A script has got to be quicker than this each time!!

Let me introduce you to S:Startup-Sequence ...

When I reboot my machine and hold down the left mouse button, it interrupts the boot sequence and loads a bare minimum option menu so that memory is available to launch stuff.  Being pretty naive, I thought this was something special with having WHDLoad installed.  It's not.

When I realised there MUST be a script somewhere that controls the boot sequence I started to ask questions on Twitter.  As usual I was kindly pointed in to the right direction, and this is where I met S:Startup-sequence for the first time.

If you open the Shell in WorkBench you can type:

ed S:Startip-sequence

This opens the file in a basic text editor, here you can see each step in the boot up.  After having a quick look around, I found this:

C:Bblank

C:GetMouseInput LOCAL

IF $MouseInput EQ 1
  Unset MouseInput
  C:SetPatch QUIET
  C:Assign >NILL: ENV: RAM:
  C:Assign >NIL: T: RAM:
  C:Execute S:Maxmem-Sequence
  EndCLI >NIL:
EndIF


From this small section of the whole script I could see that there's a check for the left mouse button, if it's pressed then it clears the memory, then executes another script called S:Maxmem-sequence.

Firing up Maxmem-sequence in the text editor, I could see the quick menu that I see when I reboot.  Excellent, I can now see the commands to launch a window with quick options.

LAB Start

C:Requestchoice >ENV:Choice "Maxmem-Sequence""Choose:""RADboot""KGLoad""Reboot""Prompt"

IF $Choice EQ "1"
  Skip RADboot
ENDIF

IF $Choice EQ "2"
  Skip KGLoad
ENDIF

IF $Choice EQ "3"
  Skip Reboot
ENDIF

IF $Choice EQ "0"
  Skip Prompt
ENDIF


Above you can see the script pops up a window with 4 options, there are then some basic IF statements to work out what the user selected. Interestingly the last button has the ID of 0.

Lets make our own script

I had to do some googling regarding Shell commands and running scripts on the Amiga.

This link is a great reference for AmigaDos:
http://winuaehelp.back2roots.org/background/amigados.htm

Scripts can be created by creating an empty text file using the regular text editor, then on each line use the AmigaDos commands just the same as if you were typing in a Shell window.

FACT: After 20+ years of using the command, I've only just realised the the Shell command CD means Change Directory.

Once you have created your script file and saved it, you have to change the protection settings of the file to be able to run it as a script.

So if you have created a new script file called "myscript" in the S: director, then open the Shell window and type:
protect S:myscript RWES
(For info: r=read, w=write, e=execute, d=delete, s=script, p=pure)

From a shell prompt you can now type: myscript and it will run. Great!

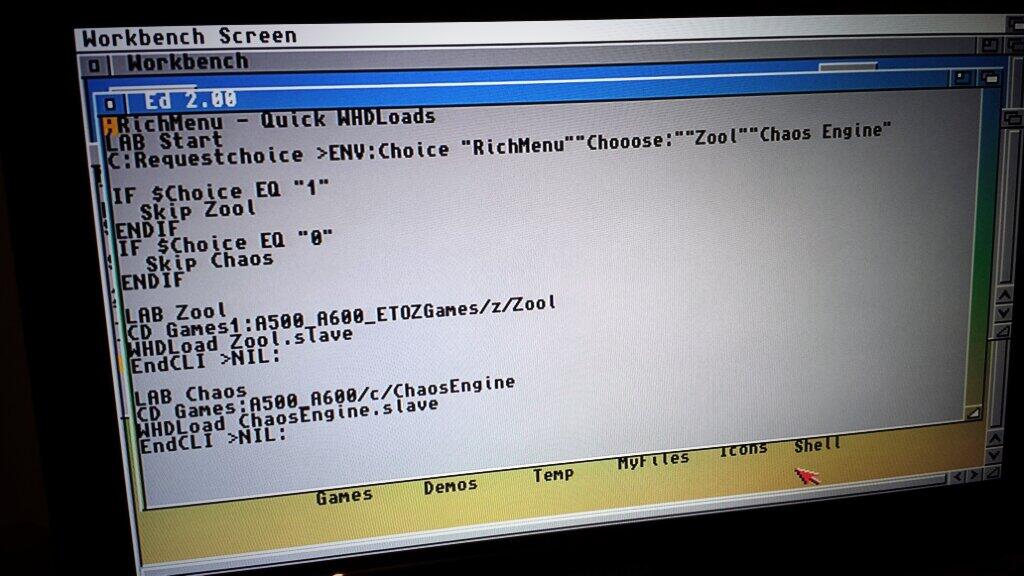
I created my own script called RichMenu which prompts the user with a window with options of quick shortcuts to games.  Using what I had just learnt this was easy, then for each option in my script all I have to do is change directory to the games' folder then call WHDLoad, as a quick example this is my script:

LAB Start

C:Requestchoice >ENV:Choice "RichMenu""Choose:""Zool""Chaos Engine"

IF $Choice EQ "1"
  Skip Zool
ENDIF

IF $Choice EQ "0"
  Skip Chaos
ENDIF
LAB Zool
  CD Games1:A500_A600_ETOZGames/Z/Zool
  WHDLoad Zool.slave
  EndCLI >NIL:

LAB Chaos
  CD Games:A500_A600/c/ChaosEngine
  WHDLoad ChaosEngine.slave
  EndCLI >NIL:
Editing the RichMenu script


Great this fires up a window with the options Zool and Chaos Engine, user selects and instantly launches the selected game.   The script works!
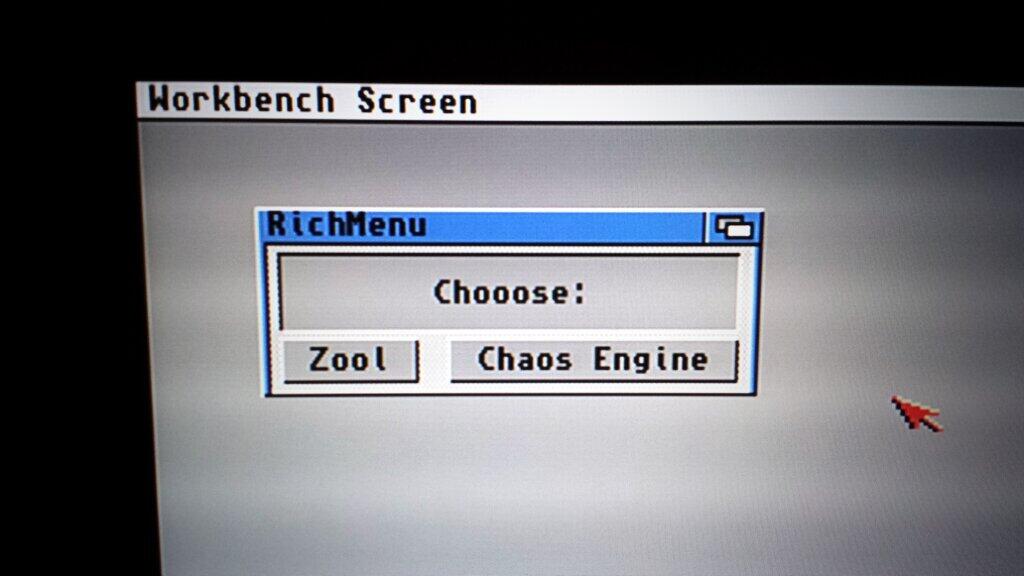
IT WORKS!
Now I just need to go back to the original Maxmem-sequence script and add an extra option.  When selected this option just runs RichMenu.  BINGO!

Here's a snippet of the new change:

LAB Start

C:Requestchoice >ENV:Choice "Maxmem-Sequence""Choose:""RADboot""KGLoad""Reboot""Prompt""Rich Menu"

IF $Choice EQ "1"
  Skip RADboot
ENDIF

IF $Choice EQ "2"
  Skip KGLoad
ENDIF

IF $Choice EQ "3"
  Skip Reboot
ENDIF

IF $Choice EQ "4"
  Skip Prompt
ENDIF

IF $Choice EQ "0"
  Skip RichMenu
ENDIF

...

LAB RichMenu
  C:Execute >NIL: S:RichMenu
  EndCLI >NIL:

To summarise

  • S:Startup-sequence checks to see if left mouse button is down.
  • If it's down then clears memory and calls, S:Maxmem-sequence
  • S:Maxmem-sequence has been updated with an extra option called "Rich Menu"
  • When "Rich Menu" is selected it calls the script called RichMenu
  • RichMenu contains shortcut options to popular games I play, when a game is selected, it changes directory to the selected game, then game is launched with WHDLoad
  • Lots of fun had

And that's it!  I hope this makes sense, and someone one day might find it useful!

Comment here or get involved on twitter: @rich_lloyd


Monday, 6 January 2014

Porting Nimble Jim over to the OUYA, easy enough? Of course it is!

So last November I got involved with the #SpeccyJam event and entered my game Nimble Jim for Windows, now it's time for the OUYA...

Comment here or get involved on twitter: @rich_lloyd
As you'll know we only had a week to produce a game in the style of a ZX Spectrum game which could run on any platform. Because it's my favourite language I wrote my game in C# and the easiest platform to get up to speed quickly is Windows. Even though it was rushed, I actually designed my code structure to be as generic as possible with the mindset of porting to other platforms. This meant I could actually choose different game engines to display and my main game code wouldn't need to change.

Because of speed and the opportunity to port to multiple platforms I chose XNA/Monogame to render my game. Actually the game I finally submitted was just XNA for Windows. As time was tight I just didn't get a chance to test or submit the game on Android/Linux/OUYA, so stuck with Windows.

That was a few weeks ago now and it's been bugging me that I didn't get a chance to produce for different platforms. So I managed to get a small bit of time over the winter break to have a bit of a play with MonoGame and the different platform options.

Port the game to mobile devices?

From past experience I know it actually takes a bit of time to get the controls just right for mobile devices playing games. People like Orange Pixel have really nailed it with their mobile games, (http://www.orangepixel.net/). Yes I managed to create an Android project and it ran my code on my phone (Samsung Galaxy S4), however at the moment in my code I've only got checks for key presses for the Windows version.

The OUYA

I was one of the original backers for the OUYA KickStarter project, hoping I'd have the console months/weeks ahead of launch to get familiar and start coding for it. OK there were delays and only received it a couple of days before launch day which has left a bitter taste in my mouth. STILL, it's a console, and a console I can easily port code to!!

So I have mixed feelings about the OUYA, but essentially would love to produce a game for the OUYA console. In MonoGame they have a project template for the OUYA, oh wait, I wrote my code using MonoGame :) Just create an OUYA project just like the Android project I thought and away I go... no... there's a few hoops to jump through first!

Hoops?! What hoops?

I'm just going to give you a brief run down of the steps I took to get working on the OUYA, but please visit here: https://devs.ouya.tv/developers/docs/mono-game for more details and will probably be kept up to date with changes.

First of all you need to sign up to be an OUYA Developer on the website: https://devs.ouya.tv/ this registers you and lets you download the latest OUYA Development Kit ODK.

Make sure you download the latest MonoGame build. There are more up to date branches of the code, but I used the latest stable release (MonoGame 3.0.1 for Visual Studio 2010). I can't remember if it's included with MonoGame or part of the ODK, there is a more up to date OUYA library to use with MonoGame, you just open the solution, build, then copy the output to a safe location and reference your project to the new library.

Connect your OUYA to your PC via USB cable, I've seen online a few people have had problems with windows not installing the driver straight away. I'm using Windows 7 and it updated drivers as soon as I plugged it and didn't have any problems.

I did have to update Google USB drivers .inf file with some OUYA information. I also had to add a line of text to the ADB USB .ini file so that the ADB manager could see the OUYA console. I wont go in to detail here, but all the details you need can be found right here: https://devs.ouya.tv/developers/docs/setup

Lastly make sure your OUYA is setup for developer mode in the Advanced Options, this will allow for it to communicate to your PC and deploy apps etc...

Those are the setup steps I took. Back to my Visual Studio project, I found I have to Rebuild my project and then Deploy which sends all the files over to the OUYA and installs them. Then I can hit the Play button and my game almost instantly starts playing on the OUYA!! At the moment this only seems to work in Debug mode, when I try Release mode, it deploys but won't run from Visual Studio. I have to go to my Play menu on the OUYA and I can see my game in the menu options where I can run it.

I hope this has all been useful for you?! I made a quick video giving the overview here:

Comment here or get involved on twitter: @rich_lloyd

Monday, 2 December 2013

#SpeccyJam is over - Nimble Jim submitted!

Finally got my #SpeccyJam game packaged up and submitted. What a week!

Took me a while, but finally came up with a name, Nimble Jim. I think the name fits perfectly for a tongue in cheek ZX Spectrum platformer. I also took some time out from coding to knock up a cheesy loading screen:

I thought some of you might be interested in how I put this together so here's some screen grabs of my steps. As you can see I'm no pixel artist, I'm just a coder. Instead of asking one of my talented artist friends to collaborate, I wanted to keep as authentic as possible as so many Spectrum games where made by 1 man bands.


You can see that initially I just flushed out roughly the elements I wanted and the composition. When it came to drawing Jim I wanted him to be full of action, so I Googled a cartoon character running, dropped on to a layer in Photoshop and roughly traced the shape. It actually came together surprisingly well. With the text I used a couple fonts and turned off anti-alias settings to get a true pixelated look. I did still have to go in at pixel level and tidy up any dodgy letters.

It felt very odd to put a domain name on the splash screen, I almost didn't, but if domain names were about in the old days I'm pretty sure they would have had them on the loading screen so I kept it in.

I left the colouring towards the end of the process, you'll see that I used many guides to block out 8x8 pixels. As we all know the limitations, only 2 colours were allowed per 8x8 block. If I had more time I probably would have moved/redrawn some of the items to take advantage of the colour blocks. I also would have improved the ghosts, but hey.

Cramming in features like there was no tomorrow

As I got closer to the deadline, my brain was exploding with new ideas to add to the game. Knowing the time limits I had to be strict! Stuff I HAD to nail:
  • Finish full game flow, and make sure it was water tight.
  • You can see from above that I managed to get a cheesy loading screen in to the game.
  • The ZX Spectrum border, yes I got this in, even flashed with game play events.
  • Sounds! OK so I started with a native computer BEEP sound, but this wasn't compatible with platforms other than Windows. So I downloaded a BEEP wav, put it in to Audacity and made some simple sound effects. These were dropped in to the game and played on events, e.g. enemy spawn, killed, pick up item...

Anything else is a bonus

Having got in the above anything else was a bonus, here are some other features I managed to get in:
  • More maps! I was able to knock out 5 basic maps, my code just reads a text file, so it's so easy to produce new maps.
  • Enemies, I wanted to expand the enemy types and make each level interesting, even though the ghosts are cool enough for a basic game ;) So I added:
    • Spikes which are static items, but over time the spikes raise and lower to make the player think about their timing.
    • Bats were also added which just have a simple horizontal path, they seem simple, but they do catch you out!
    • A BOSS! Yup I managed to squeeze in a basic boss level, he's big and all he does is jump in your direction. Sounds easy enough to beat, but you have to time your running and jumping!
  • Scrolling text, yup I went there.
  • ELEVATORS!! I was so happy I crammed this in, ability to add elevators to maps. Not only does it change how the player navigates the map, but also the ghosts!

Lets take a quick look

Here's a video of what I submitted. To make it more watchable, I used cheats to move through the levels quicker ;)


DOWNLOAD IT NOW

Here's a link to download the game I submitted to the #SpeccyJam:

DOWNLOAD GAME

Only available on Windows, extract the 2 files then launch the EXE file.

Conclusion

WHAT A GREAT WEEK! THANK YOU #SPECCYJAM!

Please check out all the other entries here: http://www.speccyjam.com/games/, there really are some great games here.

... and you can check out Nimble Jim's very own page here: http://www.speccyjam.com/games/nimble-jim/

OK Nimble Jim isn't the greatest game in the world, it's just a tongue in cheek effort, however I've been really inspired making it. It's been great working with limitations, and seeing all the other efforts for #SpeccyJam. Looking through Google + YouTube for ZX Spectrum games has brought back so many amazing memories, and I'm sure it has for everyone else.

30 years on, I spent a lot of my childhood playing games on the ZX Sepctrum, it was only until this week that I realised the Spectrum only used 15 fixed colours. I think this is proof that the games created back in the day had so much fun, engagement and creativeness.

What's next??

There's some unfinished business here... I had so many ideas I wanted to get in the game, now the jam is over I really want to try them out. That's right you haven't heard the last of Nimble Jim! My aim is to put together 50-100 levels, and then launch the game on Android, iOS, Windows Phone and the OUYA.

Something I would love to do is actually port Nimble Jim to a true ZX Spectrum, yup learn machine code for the awesome machine and get Nimble Jim running where he belongs! Then... maybe produce Nimble Jim 2 in the style of an Amiga game?! Watch this space!!

Please download my game and let me know your thoughts, be honest! Comment here or get involved on twitter: @rich_lloyd

Monday, 18 November 2013

#SpeccyJam progress after day 2/3

The game is well under way now, and it feels good

Been too busy coding for #SpeccyJam so I didn't get a chance to blog end of day 2, this will be a day 2+3 super combo. Right lets get to it...

Day 2

After day 1 I had a very simple game mechanic and render engine, I had to now get to the nitty gritty and start getting the whole game structured.

Short video of Day 2 progress:


The areas I covered:
  • Basic states to the game manager, menu, level start, playing, end of life.
  • Points scored for items collected.
  • Started to manage the HUD, top bar and also 'press key'/'level00'.
  • Improved collision detection and introduced lives.

Day 3

Absolutely buzzing and raring to go, I've managed to squeeze time in my lunch break and after work keen to get this game nailed!

I covered:
  • The player now has to collect a number of items to progress to the next level, 10 feels like a good number, but kept it at 5 for now to speed up test time.
  • I introduced the different game states on Day 2, and today I implemented using them to feedback to the user. When the player collects all the level items, or if they collide with the enemy, I now flash the screen to inform the user.
  • NEW LEVEL MAP! Day 1 I wrote a routine to load in map data from a text file, today I was able to quickly slap in a new level map. Not the most exciting of levels I know, but the level maps alternate as the player progresses through each level.
  • Refined the scoring, 10 points per item collected, then the player gets the remaining time on the clock as points when they complete a level. They also lose 50 points for losing a life.
  • Probably the thing that I'm chuffed about the most is that I introduced a new enemy with simple AI. Same as the old enemy except that it now makes a decision to jump when they reach a drop, or if they've been walking for too long. I introduce them from level 3, and it really takes the game up a step.
  • Added 2 frame sprite animations to the player and enemy. I also flip the pixels depending on if they are moving left or right.
  • Finally I migrated my code to use XNA/MonoGame with the vision of hopefully deploying to Android, OUYA and Silverlight later in the week to make it easier for others to play.


Where am I? Lets sum it up

It's only end of day 3 and I'm very happy indeed. I started off not knowing if I would have time to enter the #speccyjam, and it's turning out great. I genuinely find the game fun and playable. I sometimes catch myself playing it trying to beat the levels when I'm supposed to be testing a feature. It probably just shows how sad I am, but hey, retro gaming is in my blood.

Not sure if I'll be able to get any time tomorrow for progress, but here's some stuff on my mind I want to get done soon:
  • I need to add more maps for other levels.
  • I would like to add a tongue in cheek splash screen.
  • Add the classic ZX Spectrum borders.
  • Add additional enemies, ones that travel horizontally like a bullet or a bat. And maybe one that travels vertically like lava dripping down the map.
  • SOUND! I would like to add sound, I've started to add classic BEEP sounds, but they wont work on anything but a PC so I need to find myself a wav clip to use.
  • If I get time I would like to make an Android version which will require adding touch screen controls.
  • OH... AND I NEED TO THINK OF A NAME!!
Thank you #SpeccyJam, so far you've made my week!

Comment here or get involved on twitter: @rich_lloyd
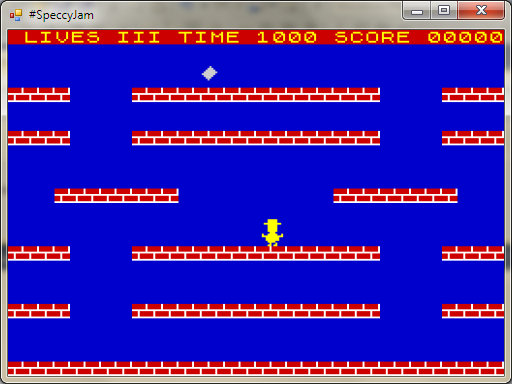
Sunday, 17 November 2013

I'm having a go at... #SpeccyJam !!

Making a game in the style of a ZX Spectrum game. Can't wait!

That's right, I'm taking a step back from the Amiga dev briefly and I'm making a game for the #SpeccyJam, my first ever jam! The game can be written on any platform, but must be as close to a ZXSpectrum game as possible.

So where do I start?! The jam is only a week long, fitting it around my family and day job, time is tight! Here are the rules: http://www.speccyjam.com/rules/.

Choose a platform... any platform...

My platform of choice is simply a Windows Form application written in C#. I would normally use Unity3D which I highly rate for developing pro games, however, the ZX Spectrum has a unique graphics display. The screen is made up of 32 x 24 attribute blocks, each block is 8x8 pixels. The tricky part is that each block can only display 2 colours at a time from a fixed palette of 15 colours.

If you're not familiar with ZX Spectrum games, then you'll not be aware of the crazyness that happens when sprites clash colours. Personally, unless you can implement these GFX rules, then I don't think it's a true ZX Spectrum replica game. This is why I stepped away from Unity3D and went down the Windows Form route, I felt I would have more control over rendering the screen. Also if I get time, I can just migrate my code to use MonoGame (XNA using Mono), and deploy to multiple platforms like Android, iOS, Linux etc...

Now for the game itself

I don't have a lot of time so it has to be simple. Many hours/days of my youth were spent playing Chuckie Egg and Manic Miner, these are true classics so will use these as my insperation. Not entirely sure where I'll take the game yet, but will be a simple player with a static level(s), collecting things, whilst bad things chase the player.

Day 1:

And we're OFF! First things first, I needed to nail an engine for displaying all the sprites on the screen as a base then build the game upon it. The way I achieved this was to draw the sprites in Photoshop using 2 colours, white + black. These are loaded in and I read the pixels storing them in my own data structure as rows of bytes for each attribute block. Each block has 2 colours, for Paper and Ink. This means I can chuck pixels around my data structure, and my engine will draw the pixels with the correct colours.

Next I built a map engine to read a text file describing a list of 8x8 pixel sprites to use, their colours and their position on the screen. Now this is in place, it will allow me to load multiple maps/levels with ease.

ZX Spectrum has a distinct font, so I drew each character as 8x8 sprites, using the same data structure I was easily able to chuck text on to the screen.

Finally on day 1, I needed a basic character I could move around the screen using the keys. As the map information was already implemented, I was able to quickly add very basic gravity and physics collisions with the scene. As I was on a roll I was able to duplicate the player code to use as a bad guy which ignored the user input. For good measure I quickly put in a collectable sprite, which I rotated through the limited colour palette ever frame, to try and make it look like it was flashing.

Quick screen shot:


Here's a quick video to demo my day 1 progress:


So that was day 1, really really happy with progress. I have the basis of my game, so I can just spend the rest of the week beefing it up, and hopefully make a game not only in the ZX Spectrum style, but actually FUN!

As I write this, I'm actually on day 2, but I've run out of time, so I will blog my progress tomorrow and through out the week.

Comment here or get involved on twitter: @rich_lloyd

Wednesday, 11 September 2013

Amiga assembler tutorials - the wonders of YouTube

I wish I had these sorts of resources back in the 90's...

After some tweets back and forth with a few cool people, I have been shown further resources on the internet for learning about assembler for the Amiga.  I just wanted to share with you a cool YouTube channel Jonas pointed out to me that has several tutorials for Amiga assembler.

If I could embed a whole YouTube channel I would, but here's a link to the channel itself by ScoopexUs: http://www.youtube.com/user/ScoopexUs?feature=g-high-cen

My time at the moment is so limited I haven't had a chance to view all the videos, but I can see there are 9 Amiga programming tutorials, as well as some demo scene stuff.  Check out the channel or here's a couple of snippets...

It starts off really simple with this:


and continues to get more in depth up to this:


Thank you to ScoopexUs for the awesome tutorials, I really hope there are more to come, and thanks to Jonas for pointing these videos out to me, as well as proper reference books.

OK SO... I need to continue being a sponge and learn about the Amiga hardware and soon hopefully I will be able to put together my first proper experience.

Comment here or get involved on twitter: @rich_lloyd

Tuesday, 25 June 2013

Easy68k... Editor / Assembler / Simulator... 68k in Windows!

I have stumbled upon Easy68k, this looks like a great way to learn vanilla 68000 assembly language.  OK so it's in Windows, but surely I'll learn the skills needed for achieving my goal of making a game for the Amiga 500.

For starters it was very easy to install and it comes with some tutorials as well as examples on their website.  The forum on their website is full of people in a similar boat of learning 68000.

So already I've been reading up and now finally have a good environment to have a play about.  I will try and share with you examples of my progress and I think this is a good starting point.

Moving a red blob!

I often find with tutorials and examples when learning technology that the basic stuff is REALLY basic, then all of a sudden the examples are so advance you struggle working out the steps involved.  With that in mind, I wanted to share an example to move a blob about the screen using some user input, the keyboard.  This covers drawing to the screen, and capturing key strokes.  

There is already a Snake type game called Pallet Eater in the examples which is great, but I just wanted to break a few things down.  Simply draw a single red square, and the user can move up / down / left / right.  That's it!


That really is it!

I'm not an expert at assembly (yet), please let me know how I can improve my code.  Any sort of hints and tips would be great. Also if there is a better way to share the code examples please let me know as the code will be getting a lot bigger!

Comment here or get involved on twitter: @rich_lloyd

Here's the code:

*-----------------------------------------------------------
* Title      : Red Blob
* Written by : Rich (http://www.retrorich.co.uk)
* Date       : 24 June 2013
* Description: Moving a red blob around the screen using keys 4,6,8,5
*-----------------------------------------------------------

CR      EQU     $0D
LF      EQU     $0A 

START   ORG    $1000

* --  Make the pen and fill red  -- 
        move.l #$000000FF,d1 
     move.b #80,d0
     trap #15
     move.l #$000000FF,d1
     move.b #81,d0
     trap #15
      
* --  Turn echo off  --
     move.b #0,d1
     move.b #12,d0
     trap #15

* --  Get the time and store it in d5
     move.b #8,d0       
     trap #15
     move.l d1,d5    
   
* --  Set game loop speed
     move.l #5,speed    

* --  Set start position --     
     lea     player,a0     
     move.w #100,(a0)+     Set the start pos to be 100, 100
     move.w #100,(a0) 
        lea     player,a0
        
* -----------------------------------

LOOP    

* -- timing the game loop --

     move.b #8,d0     Re-get the time
     trap #15
     sub.l d5,d1     Subtract the old time from this new time
     cmp.l speed,d1 If less than  hundredths of a second has passed
     blo     LOOP         Loop again until it has
     move.b #8,d0     Now that enough time has passed
     trap #15
     move.l d1,d5     Put the current time in memory for the next loop

* -- grab input --
    *Check to see if a key has been pressed
     clr.l d1
     move.b #7,d0
     trap #15
     tst.l d1
     beq     nokey     Key wasn't pressed, clear movement

    *Read the key that was pressed and find out which key it was
     move.b #5,d0
     trap #15
     
     cmp.b #$35,d1     Key pressed: 5 (down)
     beq     move_down
     cmp.b #$38,d1     Key pressed: 8 (up)
     beq     move_up
     cmp.b #$34,d1     Key pressed: 4 (left)
     beq     move_left
     cmp.b #$36,d1     Key pressed: 6 (right)
     beq     move_right


nokey
        clr.l   d6          Clear any movement
        clr.l   d7
        
continue

        move.b  #11,d0      Clear screen
        move.w  #$ff00,d1
        trap    #15
    
     lea     player,a0     Store current position
     add.w d6,(a0)+     Add any movement to position
     add.w d7,(a0) 
        lea     player,a0       Update current position

        bsr     draw_square     Draw player

        bra     LOOP

* -- key(5) was pressed
move_down
     move.w #0,d6 
     move.w #10,d7 
     bra continue

* -- key(8) was pressed
move_up
     move.w #0,d6
     move.w #-10,d7
     bra continue

* -- key(4) was pressed
move_left
     move.w #-10,d6
     move.w #0,d7
     bra continue

* -- key(6) was pressed
move_right
     move.w #10,d6
     move.w #0,d7
     bra continue

DONE    MOVE.B  #9,D0
        TRAP    #15
    
draw_square
     clr.l d1
     clr.l d2
     clr.l d3
     clr.l d4
     move.w (a0)+,d1
     move.w (a0),d2
     move.w d1,d3
     add.w #10,d3
     move.w d2,d4
     add.w #10,d4
     move.b #87,d0
     trap #15
     rts
 
speed ds.l 1       store game loop speed
player ds.w 2       store player screen pos